3D Tiles: Difference between revisions
(→�) |
No edit summary |
||
| (12 intermediate revisions by the same user not shown) | |||
| Line 1: | Line 1: | ||
[[File:M3-3d-tiles-48px.png]] | |||
''From version 4.2'' | ''From version 4.2'' | ||
Maria Map Maker is capable of importing, rendering and editing 3D models from a variety of sources. The format used for | Maria Map Maker is capable of importing, rendering and editing 3D models from a variety of sources. The format used for imported models is 3D Tiles (https://www.ogc.org/standards/3DTiles). A collection of models in the 3D Tiles format is called a 3D tileset, and contains all information about geographical position, textures and transformations to correctly place and render a model on a 3D globe. | ||
| Line 7: | Line 9: | ||
[[File:M3 import 3DTiles.PNG|right]] | [[File:M3 import 3DTiles.PNG|right]] | ||
Importing models is handled by the library assimp. A full list of supported formats can be found at https://github.com/assimp/assimp/blob/master/doc/Fileformats.md, however many of the formats have not yet been tested in Maria Map Maker. | Importing models is handled by the library assimp. A full list of supported formats can be found at https://github.com/assimp/assimp/blob/master/doc/Fileformats.md, however many of the formats have not yet been tested in Maria Map Maker. | ||
The imported 3D tileset will consist of the models themselves in the format b3dm, as well as texture files, and several text files which define the position | The imported 3D tileset will consist of the models themselves in the format b3dm, as well as texture files, and several text files which define the position and relationships between the models. | ||
=== Parameters === | === Parameters === | ||
| Line 18: | Line 20: | ||
<br clear=all> | <br clear=all> | ||
== Navigation == | |||
When you open a 3D tileset, Maria Map Maker will enable 3D mode, which will render the background map on top of the highest resolution elevation data available in your workspace (or external sources). You can also switch between 2D and 3D at any time using the button at the bottom right of the map window. There are several ways to navigate the 3D environment: | |||
When you open a 3D tileset, Maria Map Maker will enable 3D mode, which will render the background map on top of the highest resolution elevation data available in your workspace (or external sources). There are several ways to navigate the 3D environment: | |||
{| class="wikitable" | {| class="wikitable" | ||
| Line 33: | Line 34: | ||
|} | |} | ||
== 3D tilesets == | |||
3D tilesets are stored in products in the same way as other types of datasets. They can be opened by double-clicking them in a product's '''Contents''' tab. | |||
=== Model hierarchy === | === Model hierarchy === | ||
The 3D tileset is represented as a hierarchy of models. | [[File:M3_3d_tileset_submodel.PNG|300px|left]] | ||
The 3D tileset is represented as a hierarchy of models. You can import a new top-level model with the '''Add''' button, or you can create a sub-model by right-clicking a specific model in the hierarchy and clicking '''File model'''. This will open a browser for any supported 3D model formats, and then initiate a Map import. | |||
Double-click any model in the hierarchy to open its properties. | |||
You can delete models from the tileset by right-clicking it and selecting '''Remove'''. | |||
The '''Preview''' button hides the model widgets and renders the 3D environment with all 3D tilesets in the current product. | |||
<br clear=all> | |||
=== Model placement === | === Model placement === | ||
[[File:M3_3dtiles_model_properties.PNG|700px]] | |||
To adjust the placement of a model, double click any model to open its properties | |||
An important feature of the 3D tileset is that any moving, rotation or scaling of a top-level model will also apply to all is sub-models. | |||
To adjust the placement of a model, double click any model to open its properties in a window to the left. Most changes must be put in effect using the '''Apply''' button at the top of this window. | |||
A top-level model's placement on the globe is defined by geographical coordinates (latitude and longitude) and an altitude above the surface of the globe. Vertical datum is not considered. | |||
The position and altitude of a sub-model is only defined as an offset from its parent model. It is also possible to enable offset on a top-level model, in which case the offset will be in relation to the values in its Position/Altitude fields. | |||
The following table shows how models can be placed, offset and rotated in the 3D environment. The method varies according to whether the model is at the top level or a sub level. | |||
[[File:M3_3dtiles_duck_widget.PNG|right|300px]] | |||
{| class="wikitable" | {| class="wikitable" | ||
!Action | !Action | ||
!Model level | |||
!Mouse / keyboard | !Mouse / keyboard | ||
|- | |- | ||
| Move model along the surface || Ctrl + Left mouse button on the model. Holding Shift as well increases precision. | | Move model in any direction along the surface || Top level ||Ctrl + Left mouse button on the model. Holding Shift as well increases precision. | ||
|- | |- | ||
| Move model up and down || Ctrl + mouse wheel up/down. Holding Shift as well increases precision. | | Move model up and down || Top level || Ctrl + mouse wheel up/down. Holding Shift as well increases precision. | ||
|- | |||
| Offset model along X,Y, or Z axis || Top level or sub-level || Left click the arrow components of the model widget | |||
|- | |||
| Rotate model about X,Y, or Z axis || Top level or sub-level || Left click the circular components of the model widget | |||
|} | |||
The top bar of the '''Model properties''' window gives you a few convenient buttons related to the placement of a model: | |||
* '''Camera to Model''' - Move the camera to the position of the model. Only the position of the camera is moved, not the altitude. | |||
* '''Model to Camera''' - Move the model to the position of the camera. | |||
* '''Place on Terrain''' - Calculates the average height of the model and places it on the terrain at the current position | |||
==== | === Other properties === | ||
The | ==== Scale ==== | ||
The model can be scaled by a user-defined scale factor. This is mostly relevant for instance models - for instance vehicles which are placed around the 3D environment for added realism. | |||
==== Mask Footprint ==== | |||
Allow the model to mask any terrain that would otherwise clip through it. | |||
The model | ==== Geometric Error ==== | ||
The maximum allowed error in meters before a model is refined and its sub-models are considered for rendering. | |||
==== Refine ==== | |||
Refinement determines the process by which a lower resolution parent model renders when its higher resolution children are selected to be rendered. If the model has "REPLACE" refinement, the child models are rendered in place of the parent, that is, the parent model is no longer rendered. If the model has "ADD" refinement, the children are rendered in addition to the parent model. | |||
==== Color ==== | |||
Ambient ligting. Changes the base color of the model texture. White (255,255,255) is default. | |||
==== Highlight Color ==== | |||
Specular lighting. Color of the lightsource which hits the model. Black (0,0,0) is default. | |||
==== Shininess ==== | |||
The amount of light which reflects off the model. | |||
[[ | [[Category:Maria Map Maker|800]] | ||
Latest revision as of 15:31, 30 June 2022
From version 4.2
Maria Map Maker is capable of importing, rendering and editing 3D models from a variety of sources. The format used for imported models is 3D Tiles (https://www.ogc.org/standards/3DTiles). A collection of models in the 3D Tiles format is called a 3D tileset, and contains all information about geographical position, textures and transformations to correctly place and render a model on a 3D globe.
Import
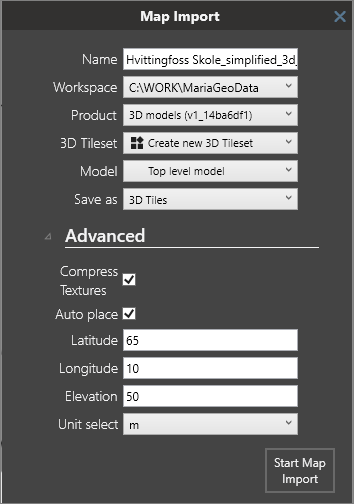
Importing models is handled by the library assimp. A full list of supported formats can be found at https://github.com/assimp/assimp/blob/master/doc/Fileformats.md, however many of the formats have not yet been tested in Maria Map Maker. The imported 3D tileset will consist of the models themselves in the format b3dm, as well as texture files, and several text files which define the position and relationships between the models.
Parameters
- 3D Tileset - Choose an existing 3D tileset as a destination for the model, or create a new tileset.
- Model - Choose an existing model as a parent for the current import, or define it as a top-level model.
- Compress textures - Compress textures into a DirectDraw Surface container file. This reduces file size, but should not be used if you intend to use the tileset in the Cesium platform, as it's not supported there.
- Auto place - Attempt to find geographic position for the model in the source files.
- Latitude / Longitude / Elevation - Manually enter position and elevation for the placement of the model. Only used if "Auto place" is disabled or unable to find geographic position in the source files.
- Unit select - Unit in the source data - meters or feet.
When you open a 3D tileset, Maria Map Maker will enable 3D mode, which will render the background map on top of the highest resolution elevation data available in your workspace (or external sources). You can also switch between 2D and 3D at any time using the button at the bottom right of the map window. There are several ways to navigate the 3D environment:
| Movement | Mouse / keyboard |
|---|---|
| Move camera along the surface | Left mouse button on the terrain / keyboard arrow keys / WASD keys. Hold Ctrl to move slower. |
| Tilt and rotate camera around a point | Right mouse button |
| Move along the camera direction | Mouse wheel up/down |
3D tilesets
3D tilesets are stored in products in the same way as other types of datasets. They can be opened by double-clicking them in a product's Contents tab.
Model hierarchy
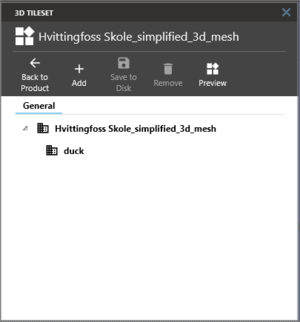
The 3D tileset is represented as a hierarchy of models. You can import a new top-level model with the Add button, or you can create a sub-model by right-clicking a specific model in the hierarchy and clicking File model. This will open a browser for any supported 3D model formats, and then initiate a Map import.
Double-click any model in the hierarchy to open its properties.
You can delete models from the tileset by right-clicking it and selecting Remove.
The Preview button hides the model widgets and renders the 3D environment with all 3D tilesets in the current product.
Model placement
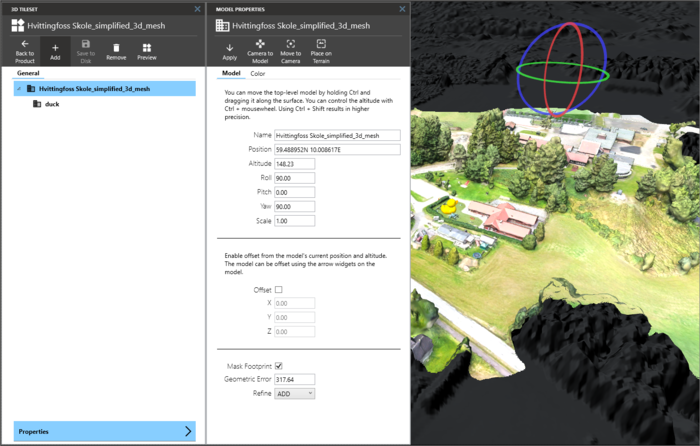
An important feature of the 3D tileset is that any moving, rotation or scaling of a top-level model will also apply to all is sub-models. To adjust the placement of a model, double click any model to open its properties in a window to the left. Most changes must be put in effect using the Apply button at the top of this window.
A top-level model's placement on the globe is defined by geographical coordinates (latitude and longitude) and an altitude above the surface of the globe. Vertical datum is not considered.
The position and altitude of a sub-model is only defined as an offset from its parent model. It is also possible to enable offset on a top-level model, in which case the offset will be in relation to the values in its Position/Altitude fields.
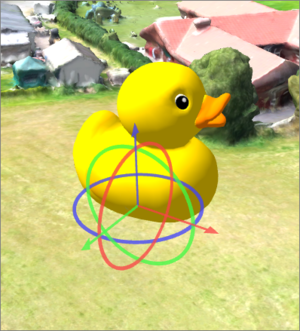
The following table shows how models can be placed, offset and rotated in the 3D environment. The method varies according to whether the model is at the top level or a sub level.
| Action | Model level | Mouse / keyboard |
|---|---|---|
| Move model in any direction along the surface | Top level | Ctrl + Left mouse button on the model. Holding Shift as well increases precision. |
| Move model up and down | Top level | Ctrl + mouse wheel up/down. Holding Shift as well increases precision. |
| Offset model along X,Y, or Z axis | Top level or sub-level | Left click the arrow components of the model widget |
| Rotate model about X,Y, or Z axis | Top level or sub-level | Left click the circular components of the model widget |
The top bar of the Model properties window gives you a few convenient buttons related to the placement of a model:
- Camera to Model - Move the camera to the position of the model. Only the position of the camera is moved, not the altitude.
- Model to Camera - Move the model to the position of the camera.
- Place on Terrain - Calculates the average height of the model and places it on the terrain at the current position
Other properties
Scale
The model can be scaled by a user-defined scale factor. This is mostly relevant for instance models - for instance vehicles which are placed around the 3D environment for added realism.
Mask Footprint
Allow the model to mask any terrain that would otherwise clip through it.
Geometric Error
The maximum allowed error in meters before a model is refined and its sub-models are considered for rendering.
Refine
Refinement determines the process by which a lower resolution parent model renders when its higher resolution children are selected to be rendered. If the model has "REPLACE" refinement, the child models are rendered in place of the parent, that is, the parent model is no longer rendered. If the model has "ADD" refinement, the children are rendered in addition to the parent model.
Color
Ambient ligting. Changes the base color of the model texture. White (255,255,255) is default.
Highlight Color
Specular lighting. Color of the lightsource which hits the model. Black (0,0,0) is default.
Shininess
The amount of light which reflects off the model.


