Tiles export
From version 4.1
The Tiles export tool allows you to extract a region of the 2D map in a basemap or overlay, and store it in a GeoPackage or MBTiles file. Everything displayed is exported, with the exception of the M3 background map. The resulting files will have web mercator (EPSG:3857) projection and GoogleMapsCompatible tiling scheme.
Usage
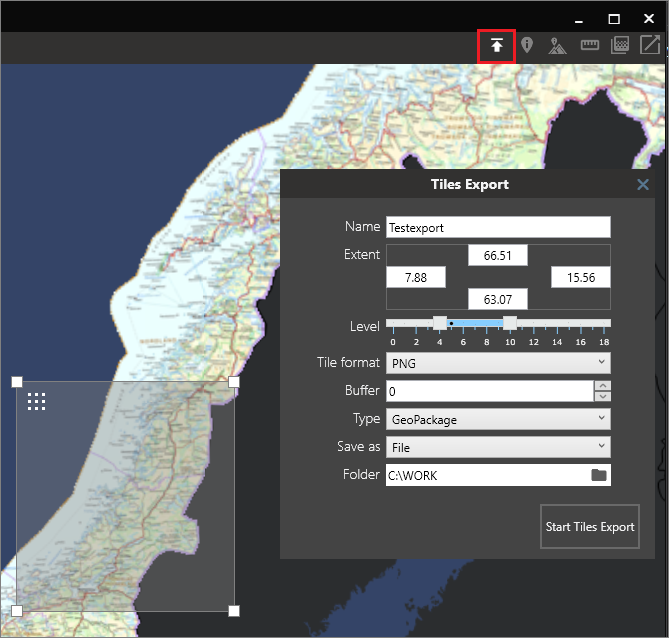
The tool can be started when a basemap or overlay is open, using the button on the top right toolbar.
Extent
You can drag a bounding box in the map to select the area to export. You can also type geographic coordinates for the extents of the area.
Min/max level
The minimum and maximum zoom levels to fetch tiles from within the selected extent. For reference, your current zoom level and map scale is always displayed in the bottom right corner of the map. Remember that for each zoom level increment, the number of tiles are quadrupled.
Tile format
Format to use when saving tiles:
- Auto - Mix of PNG and JPEG. PNG is used for tiles with transparency information, JPEG is used for fully opaque tiles.
- PNG - Lossless format, larger size. Best suited for thematic raster data with few unique colors.
- PNG8 - Only suited for thematic raster data with less than 256 unique colors. Results in small file sizes, but takes longer to export than the other options.
- JPEG - Lossy format, smaller size. Best suited for imagery and maps with shading. Any transparency information in the source tiles will be lost. Transparent areas will be filled with black (0, 0, 0).
Buffer
Extra pixels to include around each tile. Use this for vector maps with labels, if the labels are cut off at tile borders.
Type
File type for the resulting database.
Save as
Create a single file in a chosen folder, or create an M3 product (parameters for creating the product are explained here)
Elevation shading
Elevation shading can be included in the output file, generated from the highest resolution elevation dataset available in your workspace. Simply make sure that elevation shading is active before starting the tiles export. Use the button on the top right toolbar to activate elevation shading.
