Custom layer client
This section describes how to create a map client utilizing custom layers.
General
In this example we will create a custom layer annotating the geographical position of the cursor position. We will also demonstrate the difference between adding additional user controls as a part of the custom layer or as main window controls.
- Note
-
- This example is based on a map components corresponding to Basic Map Client with additional Tools.
- You will need to include the TPG.MariaGDK NuGet package.
- For more info, see Loading Maria GDK, NuGet Packages
- Sample code for this example is found in the MariaCustomLayerClient project of the Sample Projects solution.
- For troubleshooting, see Development troubleshooting
As the name indicates, the content of this layer type is determined by the need of the customer of the system. Several custom layers may be defined.
The custom layers are well suited for rendering of additional geographical or screen related information.
It may also be used to include user controls (map area buttons etc.) to the map area -- however, it is normally better to add these directly, on top of the Maria Control.
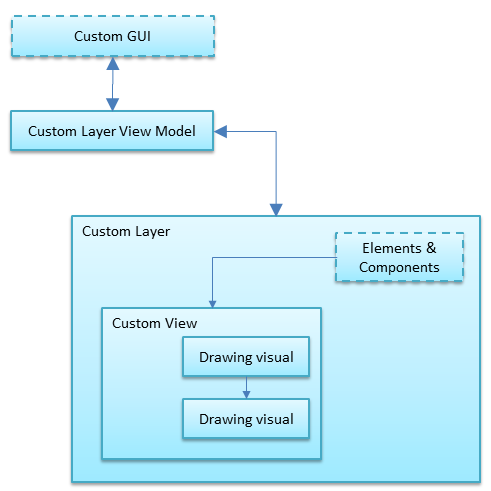
For each custom layer the following classes must be defined:
- Layer class
The equivalent the different Maria layers and layer interfaces (IMariaXxxLayer). - View class
Contains the view elements and view interaction. Equivalent to the internal handling of the layers, for rendering etc. - View- and Layer- factory classes
Used to inject the Layer and View objects into the MariaControl framework.
As stated in the Basic Map Client example, rendering of the layers will be in the same order as they are added. E.g. If your custom layer is added after the map layer, but before the track layer, the custom elements are drawn on top of the map -- and beneath the tracks.
- Note
- User controls requiring mouse button actions, should be added as the last (top level) layer to receive the mouse events properly.
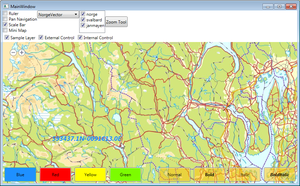
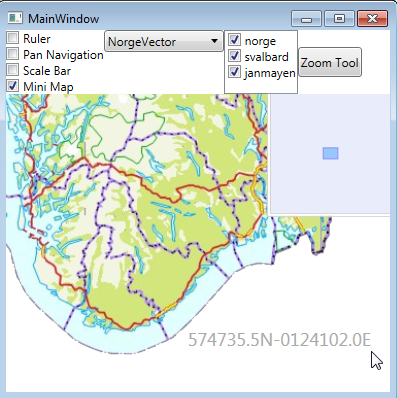
Custom layer cursor annotation.
"View" class
Create a view class (SampleView), inheriting Grid and IGeoLayerView. Include a FormattedText property to hold the annotation text. Also include a VisualHost object to be used for rendering.
public class SampleView : Grid, IGeoLayerView
{
    private readonly DrawingVisual _drawingVisual;
    private readonly VisualHost _visualHost;

    public FormattedText Annotation;

    public SampleView()
    {
        _visualHost = new VisualHost { IsHitTestVisible = false };
        _drawingVisual = new DrawingVisual();

        _visualHost.Children.Add(_drawingVisual);
        Children.Add(_visualHost);
    }
}
Then, Implement IGeoLayerView method Generate, initiating rendering.
public void Generate()
{
    var dc = _drawingVisual.RenderOpen();
    Render(dc);
    dc.Close();
}

private void Render(DrawingContext dc)
{
    // Custom layer draw code goes here, if any...
    var ptMouse = Mouse.GetPosition(this);
    if (Annotation != null)
    {
        dc.DrawText(Annotation,
                    new Point(ptMouse.X - Annotation.Width,
                              ptMouse.Y - Annotation.Height));
    }
}
"View Factory" class
Create the view factory class (SampleViewFactory) inheriting IGeoLayerViewFactory, and Implement the IGeoLayerViewFactory New method, returning the instance of your View class.
public class SampleViewFactory : IGeoLayerViewFactory
{
    private SampleView _instance;

    #region Implementation of IGeoLayerViewFactory
    public IGeoLayerView New()
    {
        return _instance ?? (_instance = new SampleView());
    }
    #endregion
}
"Layer" class
Create the layer class (SampleLayer), implementing IGeoLayerViewModel, with a field to hold the View and prepare creation of the view in the constructor.
Hint
Instead of implementing the IGeoLayerViewModel interface yourself you could have your class inherit from TPG.GeoFramework.Core.GeoLayerViewModel.
public class SampleLayer : GeoLayerViewModel
{
    private readonly SampleView _view;

    public SampleLayer()
    {
        GeoLayerViewFactory = new SampleViewFactory();
        _view = GeoLayerViewFactory.New() as SampleView;

        ClipMargins = new ClipMargins
                          {
                              ClipLeftMargin = 0,
                              ClipTopMargin = 0,
                              ClipRightMargin = 0,
                              ClipBottomMargin = 0
                          };
    }
}
Create overrides for the abstract GeoLayerViewModel methods:
- HandleInputEvent
Used for update related to mouse events etc.
For our example, we update the annotation text, then call the views Generate method. - Update
Called periodically for layer update.
For our example we do nothing.
    public override void HandleInputEvent(GeoInputEventArgs inputEventArgs)
    {
        System.Diagnostics.Trace.WriteLine("SampleLayer => HandleInputEvent : " + inputEventArgs);

        var text = Mouse.LeftButton == MouseButtonState.Released
            ? GeoContext.CursorPosition.ToString(PositionFormat.LatLonDdmmsss)
            : "";

        _view.Annotation = new FormattedText(text, CultureInfo.CurrentCulture,
                                            FlowDirection.LeftToRight,
                                            new Typeface(new FontFamily("Segoe UI"),
                                                         FontStyles.Normal,  FontWeights.Normal,
                                                         FontStretches.Medium),  18,
                                                         Brushes.DarkGray);
        _view.Generate();
    }
    public override void Update()
    {
        // Periodiscally update: refresh view when required....
        //_view.Generate();
    }
"Layer Factory" class
Create the layer factory class (SampleLayerFactory), inheriting IMariaCustomLayerFactory.
Implement the IMariaCustomLayerFactory New method, creating the SampleLayer instance.
public class SampleLayerFactory : IMariaCustomLayerFactory
{
    public IGeoLayerViewModel New(IGeoContext geoContext, IGeoNavigator geoNavigator,
                                  IGeoControlViewModel geoControlViewModel, IGeoUnitsSetting geoUnitsSetting = null)
    {
        return new SampleLayer
                   {
                       GeoContext = geoContext,
                       GeoNavigator = geoNavigator
                   };
    }
}
Create and initialize the layer
Now the new layer must be added to the MariaWindowViewModel corresponding to the standard Maria layers.
No interaction towards the layer now, so we don’t need a view model class yet!
public class MariaWindowViewModel : ViewModelBase
{
    . . .
    private readonly CustomLayer`<SampleLayer>` _sampleLayer;
    . . .
    public MariaWindowViewModel()
    {
        . . .
        _sampleLayer = new CustomLayer`<SampleLayer>`(new SampleLayerFactory());
        Layers.Add(_sampleLayer);
    }
}
Running your application, the current position will now be shown at the tip of your mouse cursor as you move the mouse around.
Custom layer interaction
It's now time to add visualization and visibility control to our custom layer! Four buttons specifying combinations of bold/italic for your annotation text four buttons and two check boxes for layer and buttons visibility.
Extend the layer code
Add the following properties to the layer code (SampleLayer):
public Brush AnnotationBrush { get; set; }
public int AnnotationFontSize { get; set; }
public FontWeight AnnotationFontWeight { get; set; }
public FontStyle AnnotationFontStyle { get; set; }
public SampleLayer()
{
    . . .
    AnnotationBrush = Brushes.DarkGray;
    AnnotationFontSize = 18;
    AnnotationFontStyle = FontStyles.Normal;
    AnnotationFontWeight = FontWeights.Normal;
}
Change the setting of the view annotation code to use the new properties:
_view.Annotation = new FormattedText(text, CultureInfo.CurrentCulture,
                                    FlowDirection.LeftToRight,
                                    new Typeface(new FontFamily("Segoe UI"),
                                                 AnnotationFontStyle,
                                                 AnnotationFontWeight,
                                                 FontStretches.Medium),
                                                 AnnotationFontSize,
                                                 AnnotationBrush);
Implement the visibility event handler.
public SampleLayer()
{
    . . .
    VisibleChanged += OnVisibleChanged;
}
private void OnVisibleChanged()
{
    _view.Visibility = Visible ? Visibility.Visible : Visibility.Hidden;
    _view.Generate();
}
Add Custom layer view model
Create a view model class (SampleLayerViewModel) for the custom layer, inheriting ViewModelBase, and implementing the initialization event handler and fields for access to the custom layer.
class SampleLayerViewModel : ViewModelBase
{
    private readonly CustomLayer`<SampleLayer>` _customLayer;
    private SampleLayer _sampleLayer;

    public SampleLayerViewModel(CustomLayer`<SampleLayer>` customLayer)
    {
        _customLayer = customLayer;
        _customLayer.LayerInitialized += OnLayerInitialized;

        _sampleLayer = _customLayer.Instance;
    }
    private void OnLayerInitialized()
    {
        _sampleLayer = _customLayer.Instance;
    }
}
Add properties for visibility and visualization:
public bool SampleLayerVisible
{
    get
    {
        return _sampleLayer.Visible;
    }
    set
    {
        _sampleLayer.Visible = value;
        NotifyPropertyChanged(() => SampleLayerVisible);
        NotifyPropertyChanged(() => ExternalControlChecBox);
        NotifyPropertyChanged(() => ExternalControlVisibility);
    }
}
public Visibility ExternalControlVisibility
{
    get
    {
        return (ExternalControlChecBox && SampleLayerVisible)
                   ? Visibility.Visible
                   : Visibility.Hidden;
    }
}
private bool _externalControlChecBox;
public bool ExternalControlChecBox
{
    get
    {
        return _externalControlChecBox;
    }
    set
    {
        _externalControlChecBox = value;
        NotifyPropertyChanged(() => ExternalControlChecBox);
        NotifyPropertyChanged(() => ExternalControlVisibility);
    }
}
public ICommand BtnNormal { get { return new DelegateCommand(x => OnBtnNormal()); } }
private void OnBtnNormal()
        {
            _sampleLayer.AnnotationFontStyle = FontStyles.Normal;
            _sampleLayer.AnnotationFontWeight = FontWeights.Normal;
        }
public ICommand BtnBold { get { return new DelegateCommand(x => OnBtnBold()); }}
private void OnBtnBold()
        {
            _sampleLayer.AnnotationFontStyle = FontStyles.Normal;
            _sampleLayer.AnnotationFontWeight = FontWeights.Bold;
        }
public ICommand BtnItalic { get { return new DelegateCommand(x => OnBtnItalic()); } }
private void OnBtnItalic()
        {
            _sampleLayer.AnnotationFontStyle = FontStyles.Italic;
            _sampleLayer.AnnotationFontWeight = FontWeights.Normal;
        }
public ICommand BtnBoldItalic { get { return new DelegateCommand(x => OnBtnBoldItalic()); } }
private void OnBtnBoldItalic()
        {
            _sampleLayer.AnnotationFontStyle = FontStyles.Italic;
            _sampleLayer.AnnotationFontWeight = FontWeights.Bold;
        }
Initiate the properties in the LayerInitialized delegate:
private void OnLayerInitialized()
{
    . . .
    SampleLayerVisible = false;
    ExternalControlChecBox = true;
}
And create SampleLayerViewModel from the main view model:
public class MariaWindowViewModel : ViewModelBase
{
    . . .
    public SampleLayerViewModel SampleLayerViewModel { get; set; }
    private readonly CustomLayer`<SampleLayer>` _sampleLayer;
    . . .
    public MariaWindowViewModel()
    {
        . . .
        _sampleLayer = new CustomLayer`<SampleLayer>`(new SampleLayerFactory());
        SampleLayerViewModel = new SampleLayerViewModel(_sampleLayer);
        Layers.Add(_sampleLayer);
    }
}
Add main window GUI elements
Add a control, in this example four buttons specifying combinations of bold/italic for your annotation text, to your main window (xaml), after the Maria User Control, with bindings to SampleLayerViewModel.
<Grid Height="50" Width="400"
      HorizontalAlignment="Right" VerticalAlignment="Bottom"
      Visibility="{Binding SampleLayerViewModel.ExternalControlVisibility}">
    `<Grid.ColumnDefinitions>`
        `<ColumnDefinition>``</ColumnDefinition>`
        `<ColumnDefinition>``</ColumnDefinition>`
        `<ColumnDefinition>``</ColumnDefinition>`
        `<ColumnDefinition>``</ColumnDefinition>`
    `</Grid.ColumnDefinitions>`
    <Button Content="Normal" Grid.Column="0"
            Background="#80FFC000"
            Margin="5"
            Command="{Binding SampleLayerViewModel.BtnNormal}"
            FontStyle="Normal"
            FontWeight="Normal"/>
    <Button Content="Bold" Grid.Column="1"
            Background="#80FFC000"
            Margin="5"
            Command="{Binding SampleLayerViewModel.BtnBold}" FontStyle="Normal"
            FontWeight="ExtraBold"/>
    <Button Content="Italic"
            Grid.Column="2"
            Background="#80FFC000"  Margin="5"
            Command="{Binding SampleLayerViewModel.BtnItalic}"
            FontStyle="Italic"
            FontWeight="Normal"/>
    <Button Content="BoldItalic"
            Grid.Column="3"
            Background="#80FFC000"
            Margin="5"
            Command="{Binding SampleLayerViewModel.BtnBoldItalic}"
            FontStyle="Italic"
            FontWeight="ExtraBold"/>
`</Grid>`
Add two check boxes to control visibility of the custom layer and of your new buttons.
<CheckBox Content="Sample Layer" ToolTip="Sample Layer"
          Name="SampleLayerActive"
          IsChecked="{Binding SampleLayerViewModel.SampleLayerVisible }"
          Margin="5"/>
<CheckBox Content="External Control"
          Name="ExternalControlActive"
          IsChecked="{Binding SampleLayerViewModel.ExternalControlChecBox}"
          IsEnabled="{Binding SampleLayerViewModel.SampleLayerVisible}"
          Margin="5"/>
Depending on the check boxes, the annotation and button controls control will now be displayed in the map area. The annotation style will change when the buttons are pressed.
Internal Controls
Create a custom GUI component
Create a UserControl (SampleControl) containing your GUI element(s), in this example four buttons for color control of the annotation text.
<UserControl x:Class="MariaCustomLayerClient.CustomLayer.SampleControl"
             xmlns="http://schemas.microsoft.com/winfx/2006/xaml/presentation"
             xmlns:x="http://schemas.microsoft.com/winfx/2006/xaml"
             xmlns:mc="http://schemas.openxmlformats.org/markup-compatibility/2006"
             xmlns:d="http://schemas.microsoft.com/expression/blend/2008"
             mc:Ignorable="d"
             Height="50" Width="400" >
    <Grid>
        <Grid>
            <Grid.ColumnDefinitions>
                <ColumnDefinition/>
                <ColumnDefinition/>
                <ColumnDefinition/>
                <ColumnDefinition/>
            </Grid.ColumnDefinitions>
            <Button Grid.Column="0" Name="BtnBlue" Content="Btn 1"
                    Background="#E0E0FF" Margin="5" Command="{Binding BtnActivated}"/>
            <Button Grid.Column="1" Name="BtnRed" Content="Btn 2"
                    Background="#FFE0E0" Margin="5" Command="{Binding BtnActivated}"/>
            <Button Grid.Column="2" Name="BtnYellow" Content="Btn 3"
                    Background="#FFFFE0" Margin="5" Command="{Binding BtnActivated}"/>
            <Button Grid.Column="3" Name="BtnGreen"  Content="Btn 4"
                    Background="#E0FFE0" Margin="5" Command="{Binding BtnActivated}"/>
        </Grid>
    </Grid>
</UserControl>
Add the component to the custom layer
In the layer class (SampleLayer), add a SampleControl field and a visibility property.
public class SampleLayer : GeoLayerViewModel
{
    . . .
    private SampleControl _internalControl;
    public bool InternalControlVisible
    {
        get { return _internalControl.Visibility == Visibility.Visible; }
        set
        {
            _internalControl.Visibility = value ? Visibility.Visible : Visibility.Hidden;
        }
    }
    . . .
Instantiate the control form the constructor -- and add implementation of the BtnClicked event updating the brush according to the selected button.
    public SampleLayer()
    {
        . . .
        AddInternalControl();
        . . .
    }
    private void AddInternalControl()
    {
        _internalControl = new SampleControl
                               {
                                   HorizontalAlignment = HorizontalAlignment.Left,
                                   VerticalAlignment = VerticalAlignment.Bottom,
                                   BtnBlue = { Content = "Blue",
                                               Background = Brushes.DodgerBlue },
                                   BtnRed = { Content = "Red",
                                              Background = Brushes.Red },
                                   BtnYellow = { Content = "Yellow",
                                                 Background = Brushes.Yellow },
                                   BtnGreen = { Content = "Green",
                                                Background = Brushes.LawnGreen }
                               };

        _internalControl.BtnBlue.Click += OnInternalControlBtnClicked;
        _internalControl.BtnRed.Click += OnInternalControlBtnClicked;
        _internalControl.BtnYellow.Click += OnInternalControlBtnClicked;
        _internalControl.BtnGreen.Click += OnInternalControlBtnClicked;

        if (_view != null)
            _view.Children.Add(_internalControl);
    }
    private void OnInternalControlBtnClicked(object sender, RoutedEventArgs e)
    {
        if (sender.GetType() == typeof(Button))
        {
            var btnCliecked = (Button)sender;
            AnnotationBrush = btnCliecked.Background;
        }
    }
    . . .
}
Internal control visibility
In the interface class (SampleLayerViewModel), create a visibility property
public bool InternalControlVisible
{
    get
    {
        if (_sampleLayer == null)          return false;
        return _sampleLayer.InternalControlVisible;
    }
    set
    {
        if (_sampleLayer == null)  return;

        _sampleLayer.InternalControlVisible = value;
        NotifyPropertyChanged(() => InternalControlVisible);
    }
}
Add a visibility check box to the main window and bind to the new property
<CheckBox Content="Internal Control"
          Name="InternalControlActive"
          IsChecked="{Binding SampleLayerViewModel.InternalControlVisible}"
          IsEnabled="{Binding SampleLayerViewModel.SampleLayerVisible}"
          Margin="5"/>
The user control will now be available in the map area, and the color of the annotation will change when the buttons are pressed.


