Geofencing client
Maria provides geofence functionality, which allows the user to define geographical shapes (lines and areas) that acts as virtual "fences". This sample application will illustrate geofence management through data source specification, rule management and notification handling. For more information see Geofencing!
General
The example is based on a map component corresponding to Maria Basic Map Client, with additional map interaction and tools.
- Note
-
- You will need to include the following NuGet packages:
- TPG.GeoFramework.GeoFencingClient (Currently available from the "TPG Nightly" repository only)
- TPG.Maria.MapLayer
- TPG.Maria.DrawObjectLayer
- TPG.Maria.TrackLayer
- TPG.Maria.CustomLayer
- You will need to include the following NuGet packages:
- Sample code for this example is found in the MariaGeoFencing project, in MariaAdditionalComponents folder of the Sample Projects solution.
- For troubleshooting, see Development troubleshooting
Preparation
To demonstrate the Geo Fencing functionality, we need Tracks in a track service, and Geo Shapes (Draw objects) in a Draw Object service. We also need to move the tracks around, modify the draw objects, and to remove tracks and objects.
The following sections handles connecting to the services, and track/draw object management.
Track Information
The tracks we are working with in this sample belongs to the MariaGeoFence.Sample track store (track list), from a track service running on localhost.
Track preparation
Create track layer and TrackViewModel as described in Basic Map Client.
Then, in TrackViewModel, implement an event handler for the ServiceConnected event in addition to the LayerInitialized event. The constructor and event handlers will be looking something like this:
public TrackViewModel(IMariaTrackLayer trackLayer)
{
    _trackLayer = trackLayer;
    _trackLayer.LayerInitialized += OnTrackLayerInitialized;
    _trackLayer.ServiceConnected += OnTrackServiceConnected;
}
private void OnTrackServiceConnected(object sender, MariaServiceEventArgs args)
{
    if (_trackLayer.TrackServices.Count > 0)
    {
        var activeName = "MariaGeoFence.Sample";
        _trackLayer.ActiveTrackService = _trackLayer.TrackServices[0];

        _trackLayer.TrackLists = new ObservableCollection<string>(_trackLayer.GetTrackLists());

        if (!_trackLayer.TrackLists.Contains(activeName))
            _trackLayer.TrackLists.Add(activeName);

        _trackLayer.ActiveTrackList = activeName;
    }
}
private void OnTrackLayerInitialized()
{
    _trackLayer.TrackServices = new ObservableCollection<IMariaService> { new MariaService("TrackService")};
}
Track Management
Add the following to your application window:
| Function | GUI element | Description |
|---|---|---|
| Add | Button | Add track, e.g. at the center position of the screen area. See in Map Interaction Client. |
| Update | Button | Update all tracks to new position. See in Map Interaction Client. |
| Remove | Button | Remove all selected tracks. See in Map Interaction Client. |
| Track Move | Check box | Activate the Track Move tool. See Map interaction client/Tools interaction in Map Interaction Client. |
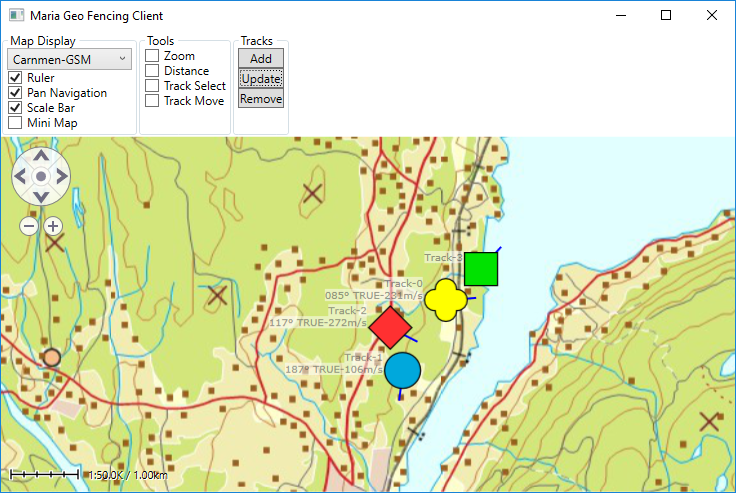
You should now be able to add, move and remove tracks from the map window.
Geo Shape Information
The draw objects we are working with should belong to the MariaGeoFence.Sample draw object store, from a local draw object service.
Draw Object preparation
Create draw layer and DrawObjectViewModel as described in Map Interaction Client.
As we now are using objects in draw object service, we need to cahange the draw layer service parameter in MariaWindowViewModel accordingly:
_drawObjectLayer = new DrawObjectLayer(true)
{
    InitializeCreationWorkflows = true
};

DrawObjectViewModel = new DrawObjectViewModel(_drawObjectLayer);
Layers.Add(_drawObjectLayer);
Remember that the layers will be rendered in the same order as they are added to the main view models Layers property. Make sure that your draw object layer is rendred before (under) your track layer.
Then, in DrawObjectViewModel, implement an event handler for the ServiceConnected event in addition to the LayerInitialized event. Add service connection when the layer is initialized, and creation/selection of draw object store when the service is connected.
The constructor and event handlers will now be looking something like this:
public DrawObjectViewModel(IMariaDrawObjectLayer drawObjectLayer)
{
    _drawObjectLayer = drawObjectLayer;

    _drawObjectLayer.LayerInitialized += OnDrawObjectLayerInitialized;
    _drawObjectLayer.ServiceConnected += OnDrawObjectServiceConnected;
}

private void OnDrawObjectLayerInitialized()
{
    _drawObjectLayer.DrawObjectServices = new ObservableCollection<IMariaService>
    {
        new MariaService("DrawObjectService")
    };
}
private void OnDrawObjectServiceConnected(object sender, MariaServiceEventArgs args)
{
    if (_drawObjectLayer.DrawObjectServices.Any())
    {
        var activeName = "MariaGeoFence.Sample";

        _drawObjectLayer.ActiveDrawObjectService = _drawObjectLayer.DrawObjectServices[0];

        _drawObjectLayer.DrawObjectServiceStores =
            new ObservableCollection<string>(_drawObjectLayer.GetDrawObjectServiceStores());

        if (!_drawObjectLayer.DrawObjectServiceStores.Contains(activeName))
            _drawObjectLayer.DrawObjectServiceStores.Add(activeName);

        _drawObjectLayer.ActiveDrawObjectServiceStore = activeName;
    }
}
Make sure that your App.config file contains an end point specification for the Draw Object Service. See Service Configuration Setup.
Draw Object Management
Add the following to your Application window:
| Function | GUI element | Description |
|---|---|---|
| Add | Button | Add draw object, e.g. at random position within the screen area. See Create draw objects programmatically in Map Interaction Client. |
| Pt.Edit | Button | Point edit mode for selected draw object. See in Map Interaction Client. |
| Remove | Button | Remove selected draw objects. See in Map Interaction Client. |
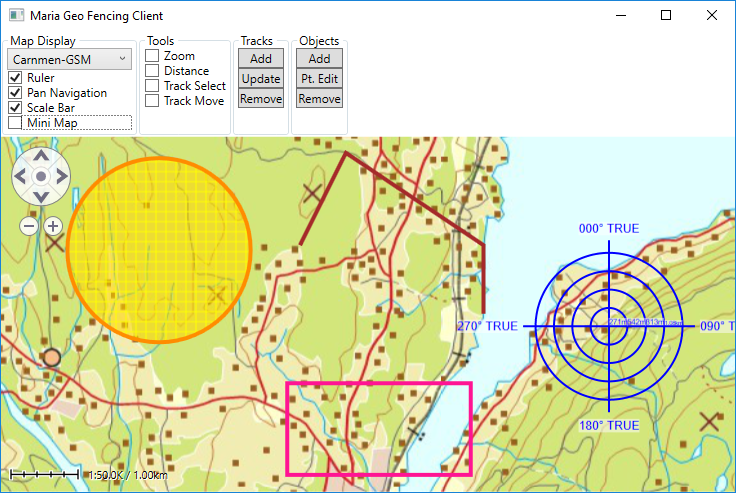
You should now be able to add, move and remove draw objects from the map window.
Data source management
Geo Fence Data Sources are accessed programmatically through the IDataManagerService interface. For additional information, see Geofencing.
Connect to service
Create a view model class (GeoFenceDataSourceViewModel) for data source management, inheriting ViewModelBase.
 public class GeoFenceDataSourceViewModel : ViewModelBase
 {
 }
Connect to the DataManager part of the GeoFencingService from the constructor. The code will look like this:
private IBindingFactory _bindingFactory = new BindingFactory();
private IEndpointAddressFactory _endpointAddressFactory = new EndpointAddressFactory();
private DataManagerServiceClient _clientDataManager;
. . .
public GeoFenceDataSourceViewModel()
{
    StatusDataMgrCon = "-";

    _clientDataManager =
        new DataManagerServiceClient(
            _bindingFactory.NewFromConfigurationFile("GeoFencingService/DataManager"),
            _endpointAddressFactory.NewFromConfigurationFile(
              "GeoFencingService/DataManager"));
    _clientDataManager.ServiceConnected += OnDataManagerServiceConnected;
    _clientDataManager.Connect();
}

private void OnDataManagerServiceConnected(object sender, EventArgs args)
{
}
Make sure that your App.config file contains an end point specification for GeoFencingService/DataManager. See Service Configuration.
Then, define and instansiate the GeoFenceDataSourceViewModel in the declarations and constructor of the main view model (MariaWindowViewModel).
public GeoFenceDataSourceViewModel GeoFenceDataSourceViewModel { get; set; }
. . .
public MariaWindowViewModel()
{
    . . .
    GeoFenceDataSourceViewModel = new GeoFenceDataSourceViewModel();
    . . .
}
Defining Data Sources
When the service connection is established, the datasources can be added. The code will look like this:
private void OnDataManagerServiceConnected(object sender, EventArgs args)
{
    AddDataSources();
}
private void AddDataSources()
{
    var trackDefinition = new DataSourceDefinition
    {
        DefinitionId =
          new Guid("{EEFBFC23-1574-492B-B05B-B443BD6FB642}"), // or Guid of your choise!
        ObjectType = GenericObjectType.Track,
        ServiceURI =
          _endpointAddressFactory.NewFromConfigurationFile("TrackService").Uri.ToString(),
        ListId = "MariaGeoFence.Sample"
    };
    _clientDataManager.AddDataSource(trackDefinition);

    var drawObjectDefinition = new DataSourceDefinition
    {
        DefinitionId =
          new Guid("{2630207A-DF9A-4DC1-ADA9-BF6CEB6DBF04}"), // or Guid of your choise!
        ObjectType = GenericObjectType.GeoShape,
        ServiceURI =
          _endpointAddressFactory.NewFromConfigurationFile(
              "DrawObjectService").Uri.ToString(),
        ListId = "MariaGeoFence.Sample"
    };
    _clientDataManager.AddDataSource(drawObjectDefinition);
}
Rule management
Geo Fence Rules are accessed programmatically through the IGeoFencingRuleService interface.
Note:
Please note that defined rules will have effect for all clients connected to the service.
In a multi-client environment, Rule Management will typically be a task performed by administrators.
For additional information, see GeoFencing -.
Connect to services
Create a view model class (GeoFenceRuleViewModel) for rule management, inheriting ViewModelBase.
 public class GeoFenceRuleViewModel: ViewModelBase
 {
 }
Create a constructor, and connect to the FenceRule part of the GeoFencingService from the constructor. The code will look like this:
private IBindingFactory _bindingFactory = new BindingFactory();
private IEndpointAddressFactory _endpointAddressFactory = new EndpointAddressFactory();
private FenceRuleServiceClient _clientFenceRule;
. . .
public GeoFenceRuleViewModel()
{
    _clientFenceRule =
        new FenceRuleServiceClient(
            _bindingFactory.NewFromConfigurationFile("GeoFencingService/FenceRule"),
            _endpointAddressFactory.NewFromConfigurationFile("GeoFencingService/FenceRule"));
    _clientFenceRule.ServiceConnected += OnFenceRuleClientServiceConnected;
    _clientFenceRule.Connect();
}
private void OnFenceRuleClientServiceConnected(object sender, EventArgs args)
{
}
Make sure that your App.config file contains an end point specification for the GeoFencingService/FenceRule. See Service Configuration.
Then, define and instansiate the GeoFenceRuleViewModel in the declarations and constructor of the main view model (MariaWindowViewModel).
public GeoFenceRuleViewModel GeoFenceRuleViewModel { get; set; }
. . .
public MariaWindowViewModel()
{
    . . .
    GeoFenceRuleViewModel = new GeoFenceRuleViewModel();
    . . .
}
Add generic rules
When the service connection is established, rules can be added.
As a start, we will add some generic rules.
private void OnFenceRuleClientServiceConnected(object sender, EventArgs args)
{
  // Example Guids!
  Guid SimpleLeavingRuleId =  new Guid("{4E4FD902-940B-4CBF-BBBB-BB48A8C07EF9}");
  Guid SimpleEnterRuleId = new Guid( "{5359804C-624F-4A44-973E-E1E6E0BF2912}");
  Guid SimpleCrossingRuleId = new Guid( "{60A70116-379F-4245-B2F1-68B4542FA8F8}");

  _clientFenceRule.AddRule(SimpleRule(SimpleLeavingRuleId,
                                      GeoFenceInteractions.Entering,
                                      NotificationLevel.High));
  _clientFenceRule.AddRule(SimpleRule(SimpleEnterRuleId,
                                      GeoFenceInteractions.Leaving,
                                      NotificationLevel.Low));
  _clientFenceRule.AddRule(SimpleRule(SimpleCrossingRuleId,
                                      GeoFenceInteractions.Crossing,
                                      NotificationLevel.Medium));
}

private GeoFenceRuleDef SimpleRule(Guid ruleId,
                                   GeoFenceInteractions interaction,
                                   NotificationLevel level)
{
  var ruleDef = new GeoFenceRuleDef
  {
    Id = ruleId,
    Interactions = interaction,
    NotificationTemplate = CreateTemplate(level)
  };

  return ruleDef;
}

private NotificationTemplateDef CreateTemplate(NotificationLevel level)
{
    var template = new NotificationTemplateDef
    {
        NotificationLevel = level,
        Heading = "[level], [track.name]([track.identity]) [interaction] [shape.Name], " +
                  "Crs:[track.course]° Spd:[track.speed], [datetime]"
    };

    template.TrackFields.AddRange(new[] {"name", "identity"});
    template.GeoShapeFields.AddRange(new[] {"Name"});

    return template;
}
Adding some tracks and geo shapes, you should now be able to generate notifications when moving tracks in and out of geo areas, and across lines.
Get rules from the service
We will now ask the service for currently defined rules, and display the result. For this, we need to add a list property and a command handler to the view model.
public ICommand GetRulesCmnd { get { return new DelegateCommand(x => GetRules()); } }
private void GetRules()
{
    NotifyPropertyChanged(() => RulesCollection);
}

private List<GeoFenceRuleDef> _rulesList;
public ObservableCollection<string> RulesCollection
{
    get
    {
        var result = new ObservableCollection<string>();

        if (_clientFenceRule == null)
            result.Add("--");
        else
        {
            _rulesList = _clientFenceRule.GetRules();
            if (_rulesList == null || !_rulesList.Any())
                result.Add("No rules...");
            else
                foreach (var rule in _rulesList)
                {
                    result.Add(
                      "=> " + rule.Interactions + ", " +
                      rule.TrackConditionXml + rule.NotificationTemplate.NotificationLevel +
                      " GFCond: " + (string.IsNullOrWhiteSpace(rule.GeoFenceConditionXml) ? "No" : "Yes") +
                      " TCond: " + (string.IsNullOrWhiteSpace(rule.TrackConditionXml) ? "No" : "Yes"));
                }
        }
        return result;
    }
}

private void OnFenceRuleClientServiceConnected(object sender, EventArgs args)
{
    . . .
    NotifyPropertyChanged(() => RulesCollection);
}
Then add a button and a list box to the GUI, and bind them to the new view model properties.
  <Button Content="Get Rules"
          Command="{Binding GeoFenceRuleViewModel.GetRulesCmnd}" />
  <ListBox MinWidth="60"
           ItemsSource="{Binding GeoFenceRuleViewModel.RulesCollection}" />
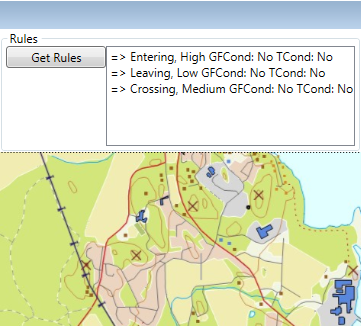
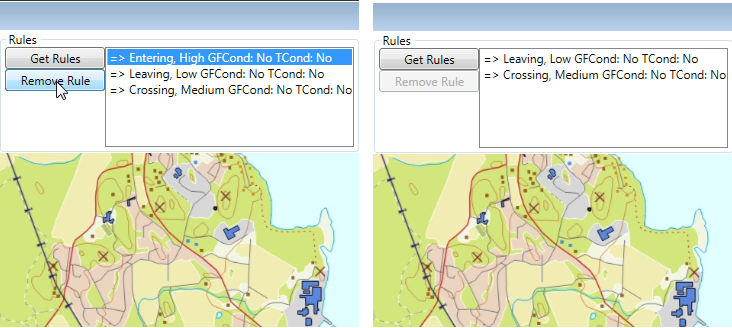
All rules defined in the service are now displayed like this:
Remove Rules from the service
Our next step is to add mechanisms to remove specified rules from the service.
Add add a command handler and list box selection properties to the view model.
public ICommand RemoveRuleCmnd { get { return new DelegateCommand(x => RemoveRule()); }}
private void RemoveRule()
{
    var element = _rulesList[SelectedRuleItemIndex];
    _clientFenceRule.DeleteRules(new List<Guid> {element.Id});

    NotifyPropertyChanged(() => RulesCollection);
}

public bool IsRuleItemSelected { get { return _selectedRuleItemIndex >= 0 && _rulesList != null; } }
private int _selectedRuleItemIndex;
public int SelectedRuleItemIndex
{
    get { return _selectedRuleItemIndex; }
    set
    {
        _selectedRuleItemIndex = value;
        NotifyPropertyChanged(() => IsRuleItemSelected);
    }
}
With corresponding GUI:
  <ListBox MinWidth="60"
         ItemsSource="{Binding GeoFenceRuleViewModel.RulesCollection}"
         SelectedIndex="{Binding GeoFenceRuleViewModel.SelectedRuleItemIndex}"
         />
  <Button Content="Remove Rule"
          Command="{Binding GeoFenceRuleViewModel.RemoveRuleCmnd}"
          IsEnabled="{Binding GeoFenceRuleViewModel.IsRuleItemSelected}" />
You should now be able to remove selected fence rules from the service!
Adding conditions to the Fence Rules
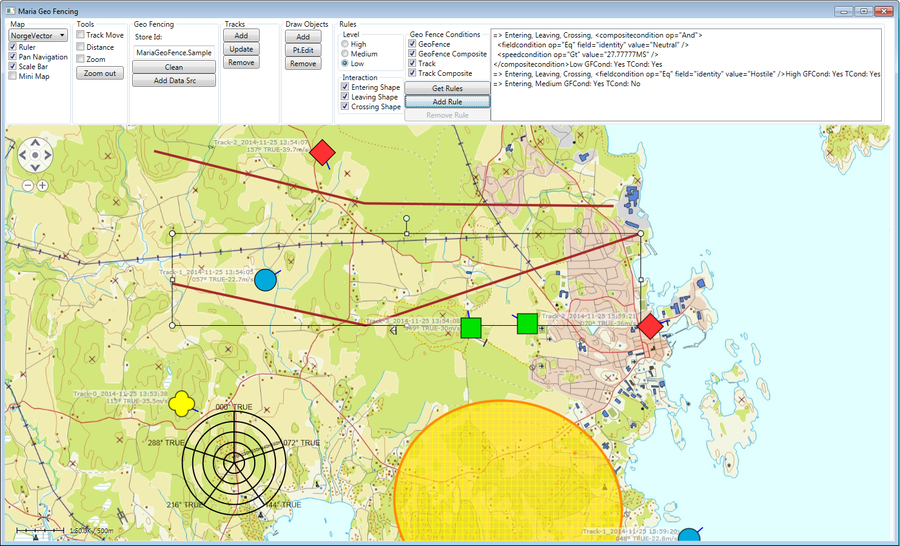
In real life, you will probably need to customise the fence rules by specifying conditions for geo shapes and tracks affected by the rule. This is accomplished by including condition xml to the GeoFenceConditionXml and TrackConditionXml properties of the GeoFenceRuleDef rule object.
In the sample code you find examples of how to create single or composite conditions. Include the track layer (IMariaTrackLayer) and the draw object layer (IMariaDrawObjectLayer) as constructor parameters to the GeoFenceRuleViewModel
| Condtition | Type | Description |
|---|---|---|
| Geo Fence Condition | Single/Composite | Affecting selected geo shapes and/or tracks, by adding user fields to the selected shapes/tracks, matching the field condition. |
| Track Conditions | Single | Affecting track with identity hostile. |
| - | Composite | Affecting track with identity neutral and speeed > 27.7777 ms. |
Notification management
Geo Fence Nottifications are accessed through INotificationHandlingService interface of the Geo Fencing Service.
For additional information, see Geofencing
Connect to service
Create a view model class (GeoFenceNotificationsViewModel) for notification management, inheriting ViewModelBase.
public class GeoFenceNotificationsViewModel : ViewModelBase
{
}
Create a constructor, and connect to the NotificationHandling part of the GeoFencingService. The code will look like this:
private IBindingFactory _bindingFactory = new BindingFactory();
private IEndpointAddressFactory _endpointAddressFactory = new EndpointAddressFactory();
private NotificationHandlingServiceClient _clientNotification;
. . .
public GeoFenceNotificationsViewModel()
{
    _clientNotification =
        new NotificationHandlingServiceClient(
            _bindingFactory.NewFromConfigurationFile(GeoFenceDefs.DefaultGeoFenceNotificationName),
            _endpointAddressFactory.NewFromConfigurationFile(GeoFenceDefs.DefaultGeoFenceNotificationName));

    _clientNotification.ServiceConnected += OnNotificationClientServiceConnected;
    _clientNotification.Connect();
}

private void OnNotificationClientServiceConnected(object sender, EventArgs args)
{
}
Make sure that your App.config file contains an end point specification for the GeoFencingService/NotificationHandling. See Service Configuration.
Then, define and instansiate the GeoFenceNotificationsViewModel in the declarations and constructor of the main view model (MariaWindowViewModel).
public GeoFenceNotificationsViewModel GeoFenceNotificationsViewModel { get; set; }
. . .
public MariaWindowViewModel()
{
    . . .
    GeoFenceNotificationsViewModel = new GeoFenceNotificationsViewModel();
    . . .
}
Collect Notifications
Our first step is to collect current notifications from the connected service, and display the result.\ For this, we need to add a list property and a command handler to the view model.
private NotificationQueryResult _notifications;

public ObservableCollection<string> DisplayListItems { get; private set; }

public ICommand PollCmnd { get { return new DelegateCommand(x => PollNotifications()); } }

public GeoFenceNotificationsViewModel()
{
    DisplayListItems = new ObservableCollection<string>();
    . . .
}
. . .
private void PollNotifications()
{
    if (_clientNotification == null || !_clientNotification.Connected)
        return;

    _notifications = _clientNotification.GetNotifications("", -1);

    DisplayListItems.Clear();
    if (_notifications != null)
    {
        foreach (var item in _notifications.Notifications)
        {
            DisplayListItems.Add(item.Heading);
        }
    }
    NotifyPropertyChanged(() => DisplayListItems);
}
Then add a button and a list box to the GUI, and bind them to the new view model properties.
<Button  MinWidth="60" HorizontalAlignment="Left"  Margin="0,0,5,0"
         Content="Poll"
         Command="{Binding GeoFenceNotificationsViewModel.PollCmnd}" />

<GroupBox Header="Notifications:">
    <ListBox Height="Auto" VerticalAlignment="Top" MinWidth="40"
             ItemsSource="{Binding GeoFenceNotificationsViewModel.DisplayListItems}"
             />
</GroupBox>
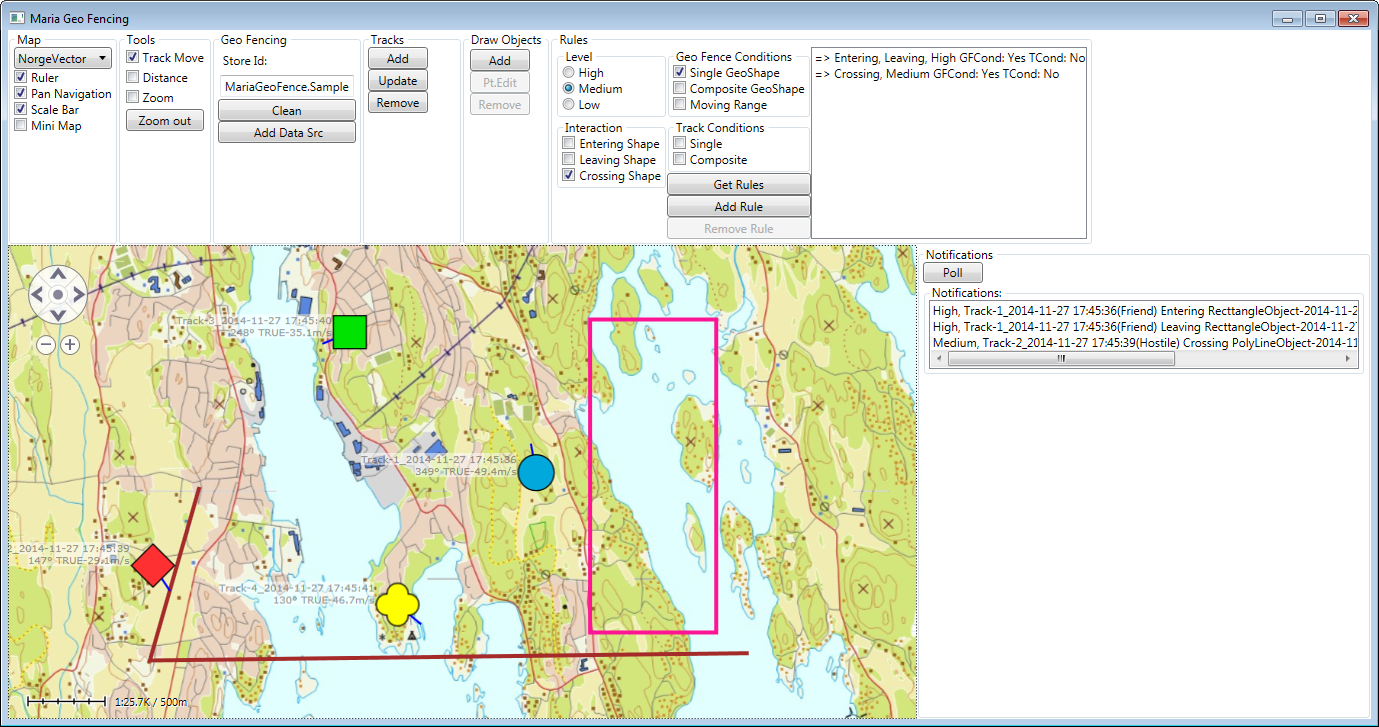
All current notifications from the service are now displayed. The number of items may be large! It will look like this:
Reduce amount of Notifications
Notifications are collected by request, and by default, all notifications are collected. As we normally are interested in a limited set of information, there are two different ways to reduce the information.
- Retreive by "Generation"
- Specify filter conditions
The reduction methods can be used saparately, or in combination.
Notification generations
The Geo Fencing Service, Notification Handling maintains a "generation" counter. The counter value is stepped up every time new geo fence events are detected. The current generation is available in the returned notification result.
By specifying the generation counter of the last read information, you will have a mechanism that retrieves new notifications only.
public class GeoFenceNotificationsViewModel : ViewModelBase
{
    . . .
    private void PollNotifications()
    {
        . . .
        _notificationResult =
          _clientNotification.GetNotifications("",
                                               (_notificationResult != null) ?
                                               _notificationResult.Generation :
                                               -1);
        . . .
    }
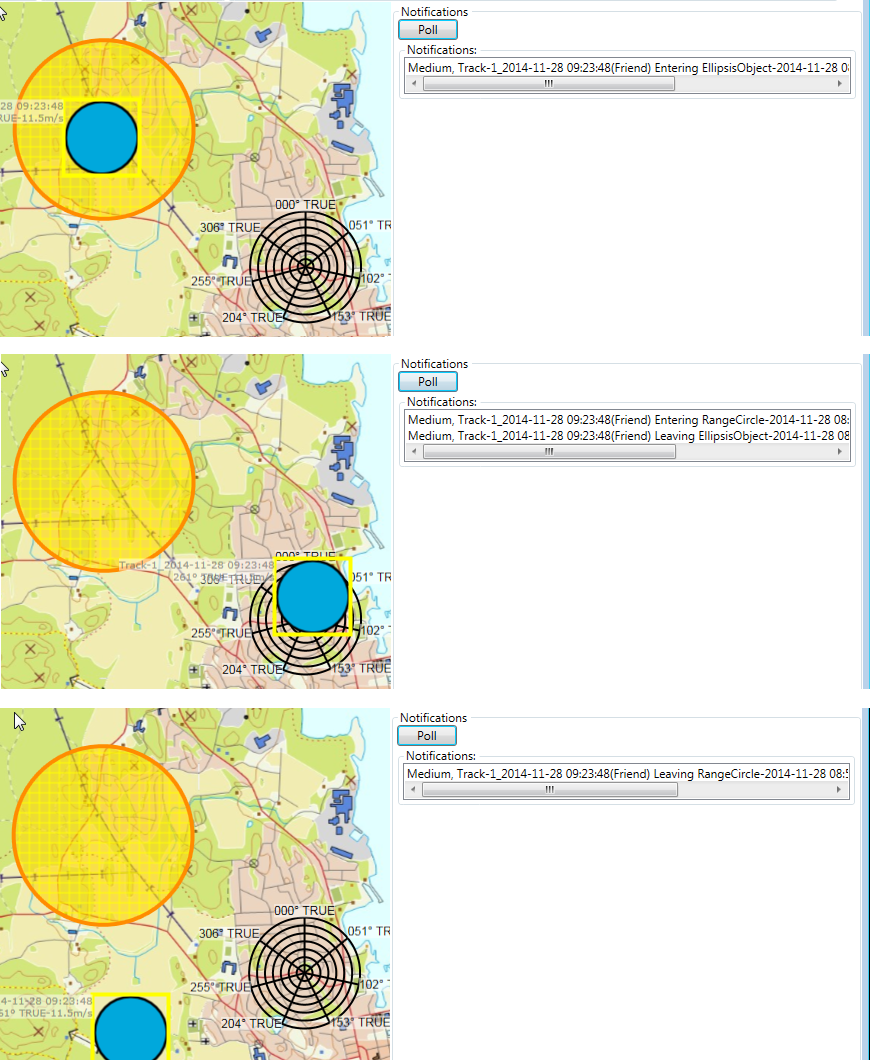
The result will look like this:
Filtering notifications
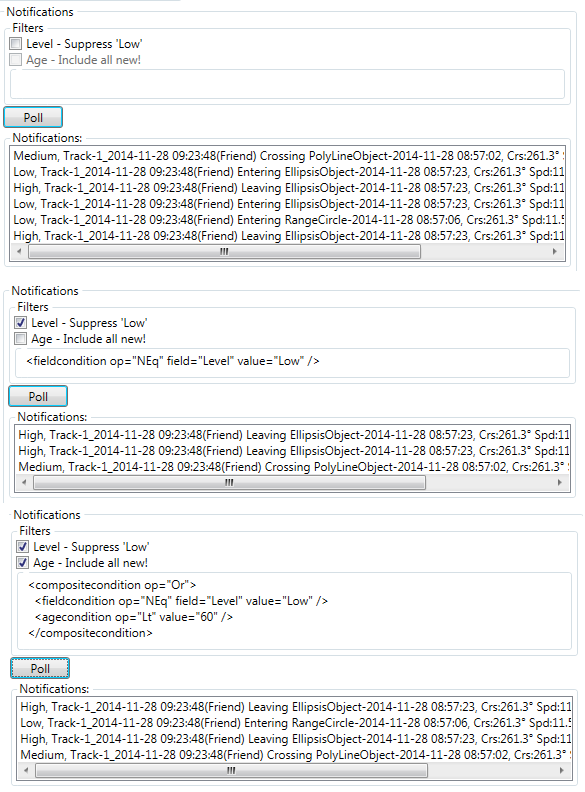
The notification filter is an XML string, specifying one or or several conditions. Here we will include a simple filter supressing low level notifications, and a composite filter supressing low level notifcations older than 60 seconds. We'll also add automatic poll whenever the filter conditions change.
In the view model, add the following properties:
private string _conditionXml;
public string ConditionXml
{
    get { return _conditionXml; }
    set
    {
        _conditionXml = value;
        NotifyPropertyChanged(() => ConditionXml);
    }
}

private bool _supressLowLevel;
public bool SupressLowLevel
{
    get { return _supressLowLevel; }
    set
    {
        _supressLowLevel = value;

        NotifyPropertyChanged(() => SupressLowLevel);
        PollNotifications();
    }
}

private bool _includeAllNew;
public bool IncludeAllNew
{
    get { return _includeAllNew; }
    set
    {
        _includeAllNew = value;

        NotifyPropertyChanged(() => IncludeAllNew);
        PollNotifications();
    }
}
Update the polling mechanism:
. . .
private void PollNotifications()
{
    . . .
    // By filter conditions
    UpdateConditionXml();
    _notificationResult = _clientNotification.GetNotifications(ConditionXml, -1);
    . . .
}

private void UpdateConditionXml()
{
    var conditionXml = "";
    var compMainCondition = new CompositeCondition { Operator = GroupOperator.And };

    if (SupressLowLevel)
    {
        var compSubCondition = new CompositeCondition { Operator = GroupOperator.Or };
        compSubCondition.Children.Add(new FieldCondition("Level",
                                                         NotificationLevel.Low.ToString(),
                                                         FieldOperator.NEq));

        if (IncludeAllNew)
        {
            compSubCondition.Children.Add(new AgeCondition { Operator = FieldOperator.Lt,
                                                            Age = 60.0 });
        }
        conditionXml = GenericFielsConditionFilter(compSubCondition);
        compMainCondition.Children.Add(compSubCondition);
    }

    ConditionXml = conditionXml;
}

private string GenericFielsConditionFilter(ICondition condition)
{
    var filterXml = @"<GeoFencingFilters>"
                    + (new ConditionXmlParser(new ConditionFactory())).WriteCondition(condition)
                    + @"</GeoFencingFilters>";

    var fsp = new GeoFencingXmlParserUtils();
    var result = fsp.ParseGeoFenceFilters(filterXml);

    return result;
}
Then add components and bindings to the GUI:
<GroupBox Header="Filters" >
    <StackPanel Orientation="Vertical">
        <CheckBox Content="Level - Suppress 'Low'"
                  IsChecked="{Binding GeoFenceNotificationsViewModel.SupressLowLevel}" />
        <CheckBox Content="Age - Include all new!"
                  IsChecked="{Binding GeoFenceNotificationsViewModel.IncludeAllNew}"
                  IsEnabled="{Binding GeoFenceNotificationsViewModel.SupressLowLevel}"/>
        <GroupBox>
            <Label Content="{Binding GeoFenceNotificationsViewModel.ConditionXml}" />
        </GroupBox>
    </StackPanel>
</GroupBox>
After creating some notifications of different levels, the result with different filters would be something like this:
Examples of filtering according to specific tracks and drawobjects can be found in Visualization
Add user data to notification.
It is not possible to modify the notification information, however, it is possible to add user data, like processing information.
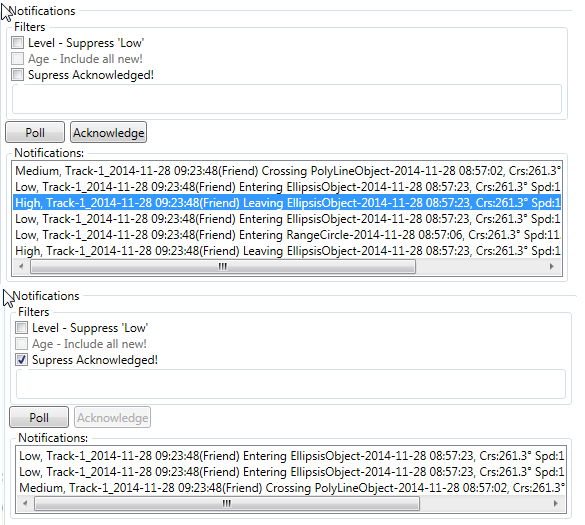
In the sample application, you can find an example of adding acknowledged tag to selected notification item, with corresponding "Acknowledged" filter. Setting the acknowledge tag like this:
_clientNotification.SetNotificationUserData(
  _notificationResult.Notifications[SelectedNotificationItemIndex].Id,
  new UserDataDefinition
  {
    Owner = "MariaGeoFenceTestClient",
    Key = "userdata/*/state",
    Value = "acknowledged"
  });

PollNotifications();
Details for items selction and filter setting is found in the sample code.
The result will be like this:
